Friday, January 6, 2017

Adjusting The New Press

Before I tell the story, I want to give a little of the background reality... I'm snowed in. The last time I could get my van out was New Year's Eve, six days ago. Since I'm renting a space in "downtown" Wolf Creek for the letterpress studio and storefront, I need to hike two miles in the snow to get there. The short days and my reluctance to hike on the ice and snow in the dark make for extremely truncated working hours. This pressroom setup is taking way longer than I expected as a result. C'est la vie! It's still happening at a blinding speed.

-----

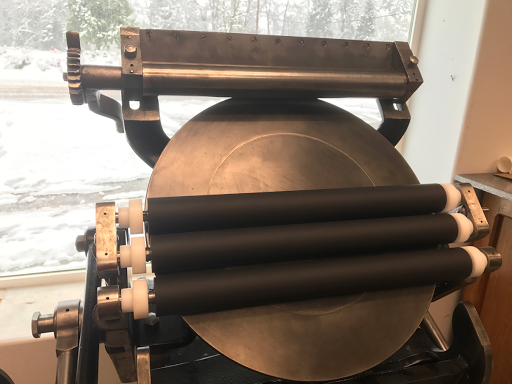
Finally, the last part arrived in the mail to allow me to get started printing - freshly covered rollers!

 
[New rollers on the original antique cores]

The rollers are a critical part of the printing process. They will be adjusted to pick up ink from the big disk and just barely touch the surface of the printing form. (the type and image blocks) One pass across the form and back should evenly coat it with just enough ink for the next impression.

 
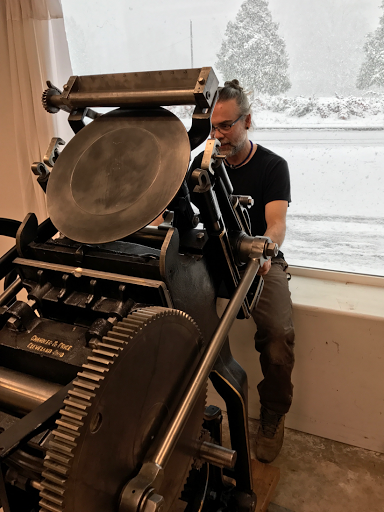
[New rollers and new Delrin trucks on the press]

(Note, I let the rollers sit on the disk like this for about 10 seconds while I took this picture. I don't need flat spots.)

I got these installed and went on to adjust the platen before I inked up the disk. This is one of those things that needs to be done very rarely, and thank goodness. It is incredibly difficult to get all four corners at the correct height. Each adjustment to one corner affects the other three. You just have to nudge every bolt, closer and closer, until they're all in the right place. For the last hour of it, I'm literally tweaking the bolts by the tiniest amount to move the platen up and down by 1/1000 of an inch or less.

 
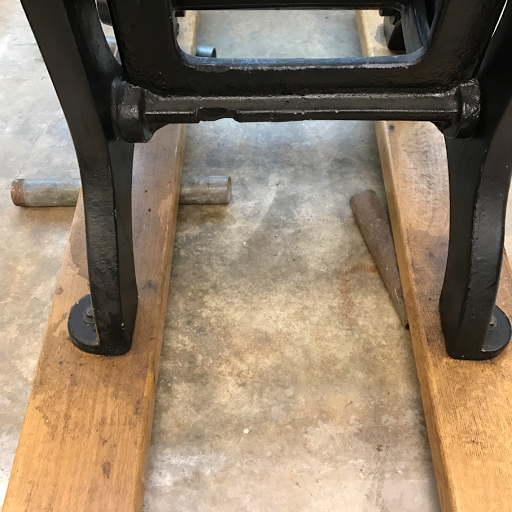
[Measuring the platen distance, near and far]

There are a few ways to measure the distance from the press bed to the platen. I use a platen height gauge from John Falstrom. (http://www.perennialdesigns.net) When the platen is at the right height, the gauge will just barely slide between the press bed and the platen. No wiggling, no pinching.

[Original platen wrench, original grime]

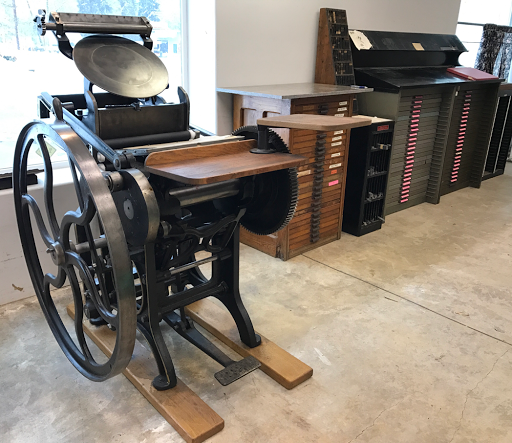
Once the platen was adjusted, I set some type and locked up the form so that it would be ready to go once the roller heights were adjusted. This is my first time trying to evoke a particular look and feel from the cases and cases of type at my fingertips. It will take a long time before I have enough experience with the metal type to quickly choose the right fonts for the task at hand.

 
 [Metal type from my collection: Stymie and Figaro]

[Linoleum image and type locked up in the chase]

Notice how I have a square frame around the type? The theory here is that I can rotate that square for landscape or portrait cards without having to redesign the rest of the lockup. Once I had the image and type locked up in the right relationship to each other, it was time to test the roller height and make any corrections.

 
[Height gauge says the rollers are low]

"The Lollipop" is a slick tool that lives on the other end of the Falstrom gauge. It slides under the rollers and tells me if they need to be raised or lowered to ink the form with the correct amount of coverage. In this photo, the ink stripe is about 9/32" wide. It should be 3/32" wide, which means I need to raise the rollers up from the rails. Thank goodness all three rollers were the same so I didn't have to adjust the rollers separately. I added height to the rails with specially made adhesive tape in thicknesses of .005" and .010". At the end, I covered the plastic tape with black electrical tape. It provides better grip to prevent the rollers from sliding and the black blends in with the black paint.

 
[Taped up rail and a closeup of the layers]

It did the trick! Eventually all three rollers were measuring the right height at the top and the bottom of the press bed.

It was finally time to ink up and pull some proofs...

 
[First proofs are a bit grey]

The first impressions of this card give the appearance of being too light, but that's not the whole story...

 
[The type is fine]

The image might look light, but the type is printing perfectly.

 
[OK, but needs makeready.]

And, on closer inspection, there are parts of the image that are printing correctly. I'll go into more detail in the next blog post, but do you see how the tips of the branches above the roof and the chimney are printing darker? This means that I need to raise up the paper everywhere BUT in those areas. More on that later...

Wednesday, January 4, 2017

Setting up the Studio

I've been snowed in for days. Every once in a while, though, it's been clear enough to walk the two miles to the studio downtown. I really want to be printing, but it's going to take a few days to get everything moved, the type unpacked, and the press adjusted.

 
[Making sure I left enough room for access]

As you saw in yesterday's video, the very heavy press rolls easily on short pieces of pipe. Once it was in place, I used a heavy hammer to pound one pipe sideways and lock the press in place while I lifted it with a car jack and removed the pipes.

 
[Pipe in the brake position]

While I was snowed in, I had taken a list of measurements home with me and worked out the beginnings of a floor plan for the new studio.
 
[The Plan]

 
[The results]

When we were packing up the type, it was all so fast that I couldn't really stop and look at all of what I was getting. Here are a few highlights from the "bullets and borders" case.

 
[Manicule, Printer's Fist]

 
[Beautiful Borders]

 
[Awesome creatures]

And then, there are the fonts themselves. I think that I will need to print a set of specimens in between real work to give me an idea of what these fonts are and how they can be used together.

 
[an unusual "rt" ligature]

It's all very exciting and will be even moreso when I finally have the press adjusted and can do some printing!

Sunday, January 1, 2017

Letterpress Studio Move, Day 3

This was a very long, exhilarating, amazing day! I brought home the most beautiful press I've ever seen and a giant paper cutter, learning how to move them in the process.

 
[Hitching up the trailer]

 
[Cutter and lumber that's about to become skids]

 
[With skids it just rolls on pipes]

 
[NOT how to move heavy objects]

These old cast iron tools are so heavy that they are impossible for one person to move unless they're up on pipes to help them roll. Once they are, you want to be very sure that they come up slowly and under control. The come-along is made for this exact job. It's capable of pulling the thing up a steep slope one inch at a time.

 
[Much better strategy]

It's relatively fast if there is someone to move the pipes while the other person cranks the come-along.

 
[Slow and steady, up, up, up]

 
[Easy roll to the front of the trailer]

Loading the guillotine first was a fantastic idea, sort of a warm-up to the main event, moving that gorgeous press.


[Watch one person easily roll the heavy press across the garage]

 
[Same as before, one inch at a time]

Well, there is one difference. We hitched the come along to the middle of the trailer, and then had to lock the press in place while we extended the come-along and moved it to the front. It's easy to hold the thing in place with some stops drilled into the plywood. This is a good reason to use 3/4" instead of the standard 1/2" plywood.

 
[Blocked in place]

Once everything was exactly in place, we got to work with the heavy duty ratchet straps. It's tied to the sides to prevent tipping with the come-alongs tied to the front and to the back to keep it from sliding during acceleration and braking.

 
[Strapped down TIGHT]

 
[Stopping for food in Brownsville]

By the time we arrived at home, it was well after dark and well below freezing. I've got some great friends, though, and they showed up to get that thing down off the trailer.

 
[Pulling in after dark]

 Working the come-along in reverse is way slower than going forward with it. This makes managing the pipes a tedious affair. I'm so glad that my friends were there to do that part. It took two hours as it is. By myself, it would have taken easily twice that.


[Down is even slower than up]

Alright! The big tools are at least in the building where they're going to live.

 
[Done for tonight!]

We had perfectly dry weather for the entire process of moving and driving, but a look at the weather report told me that I had no time to lose - I needed to get the trailer returned in a town 45 minutes away before I went to bed.

 
[Better hurry!]

Good thing I did! When I woke up and tried navigating the end of my driveway, this is what I saw. The van was barely able to navigate this much snow, and this was just the beginning.

 
[Next morning, stuck in the driveway]

I've been snowed in for two days now and loving it! I just worked nonstop for seven weeks to gain as much experience with designing, producing, and selling letterpress work. The thing that kept me pushing through week after week was the dangling carrot of a break.

 
[Yurt oculus in the snow]

 
[The view outside]

So, yeah, I'm laying around doing very little except designing the studio layout and working up ideas for product lines that I'll design and create with the new press.